
Introduction
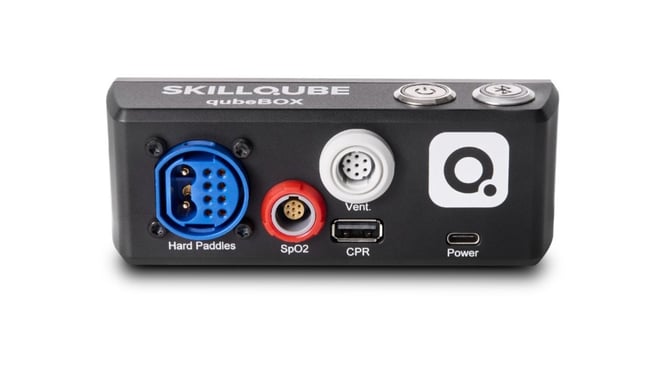
Congratulations on purchasing the qubeBOX from SKILLQUBE!
This device was developed to enable realistic and effective medical simulation training. The qubeBOX serves as a central interface for connecting sensors and monitoring technology,
making it ideal for mobile and modular training scenarios.
Scope of Delivery
1x qubeBOX
1x Power bank (13,400 mAh)
1x USB-C cable Type Gen 3.2 High-Speed
1x CPR feedback sensor
1x Ventilation sensor incl. pressure sensor
1x SpO₂ connection cable
1x SpO₂ sensor (adult)
1x Hard paddles (optional for additional charge)
User manual (digital)
Parameter Specification
|
Power Supply |
USB-C, 5V / 1A |
|
Interfaces |
CPR feedback sensor (USB-A socket) Ventilation sensor (7-pin round socket) SpO₂ sensor (7-pin round socket) Hard paddles (10-pin socket) |
|
Dimensions |
130 mm x 50 mm x 40 mm |
|
Weight |
approx. 155 g |
|
Connectivity |
Bluetooth |
|
Compatibility |
qubeSERIE from version 26.1.0 |
Overview
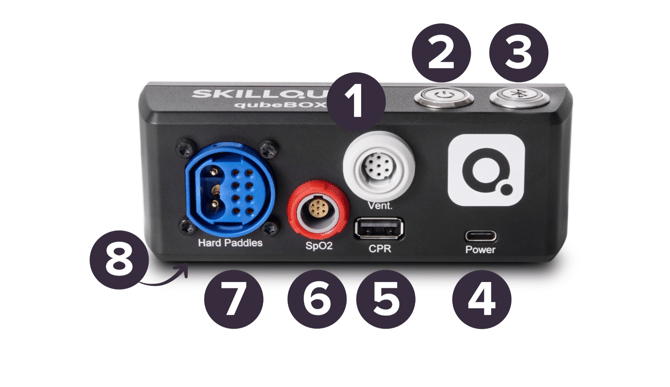
1) 7-pin circular socket (Connection for ventilation sensor)
2) On / Off switch
3) Bluetooth button
4) USB-C socket (Power supply)
5) USB-A socket (Connection for CPR feedback sensor)
6) 7-pin circular socket (Connection for SpO₂ sensor)
7) 10-pin socket (Connection for hard paddles)
8) Reset button located on the bottom (pressable with a pointed object, approx. 1.5 cm length)
Operating elements
On / Off switch (6): This switch is used to turn on the qubeBOX. The switch latches into position and remains in a pressed state. Additionally, the operating status is indicated by the integrated LED.
Bluetooth button (7): This button can be used to disconnect an existing Bluetooth connection. The integrated LED displays the connection status.
Reset button (8): This button allows you to reset the qubeBOX. The button can be pressed using a pointed object (approx. 1.5 cm length). Hold the button pressed to reset while turning on the qubeBOX. As soon as the On / Off switch flashes red, the button can be released. After the reset, the qubeBOX restarts.
LED Indicators
|
LED On/Off Switch |
LED Bluetooth button |
Status |
|
|
|
Startup of the qubeBOX |
|
|
|
Startup of the qubeBOX completed |
|
|
|
Ready for operation – qubeBOX ready for connection |
|
|
|
Ready for operation – qubeBOX connected |
|
|
|
Sensor error, disconnect all sensors and restart – qubeBOX ready for connection |
|
|
|
Sensor error, disconnect all sensors and restart – qubeBOX connected |
|
|
|
qubeBOX is being reset (see Reset button) |












Legend:
|
Solid |
Flashing |
Off |


Commissioning
Place qubeBOX
We recommend attaching the qubeBOX directly to the housing. Looking at the monitor from the front, the ideal position is at the rear right.
To attach it, stick the included metal plates onto this area of the housing. Since the qubeBOX is equipped with magnets on its rear side, it can be easily and securely fixed in place.
The power bank can be stored in one of the side pockets of the qubeL bag.
Alternatively, the qubeBOX can also be placed inside one of the pockets or positioned freely. Make sure to always position the box near the monitor iPad to guarantee a stable connection.
Establishing Power Supply
Connect the supplied USB-C cable to the free USB-C socket on the power bank. Connect
the other end of the cable to the USB-C socket (power) of the qubeBOX.
The qubeBOX can also be operated with other USB-C cables or another power source (e.g.
USB power adapter max. 5V). The battery level display can only be guaranteed with the supplied
power bank and the supplied USB-C cable. If you use a different power source or a different
cable, the qubeBOX can still be used, but the battery level will not be displayed in
qubeCONTROL.
Establishing connection
Connect all external devices (CPR feedback sensor, ventilation sensor, SpO2 sensor, Hard Paddles) that are to be used in the simulation. The connections have been selected so that the external devices cannot be interchanged. Do not force the connection. Use the labels to check whether you are using the correct socket to make the connection.
Switch on qubeBOX
Press the power switch, the switch remains in the pressed position. The power switch lights up turquoise during start-up. After a successful start, it flashes turquoise and then changes to a steady green light.
Connecting qubeBOX via Bluetooth
As soon as the qubeBOX is ready for connection, the Bluetooth button flashes blue. If the connection is successful, the Bluetooth button lights up blue continuously. An existing connection can be disconnected by pressing the Bluetooth button.
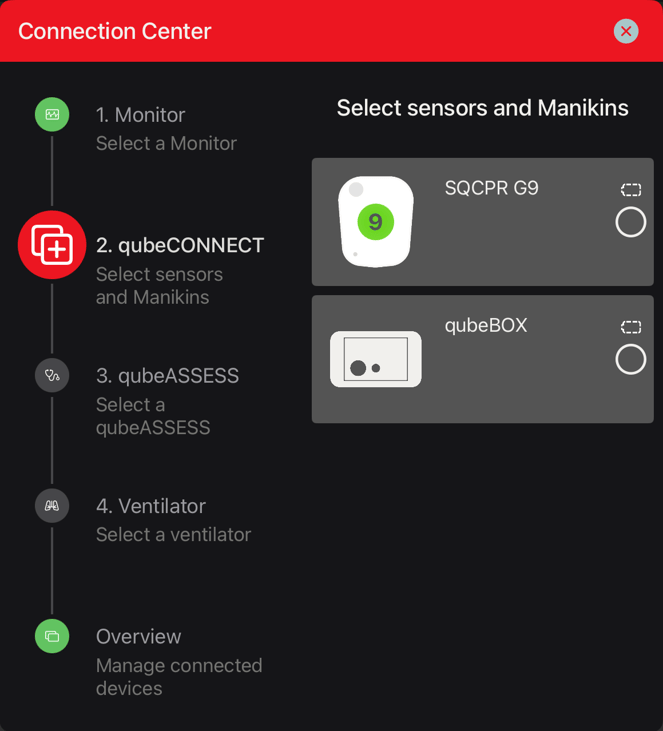
To connect the qubeBOX, first connect the qubeCONTROL to one of our qubeSERIES monitors (e.g. qubeZERO). Make sure that the qubeBOX is close to the monitor iPad to ensure a smooth connection. Then select the qubeBOX for connection in the Connection Center under qubeCONNECT.
qubeBOX Detailed View
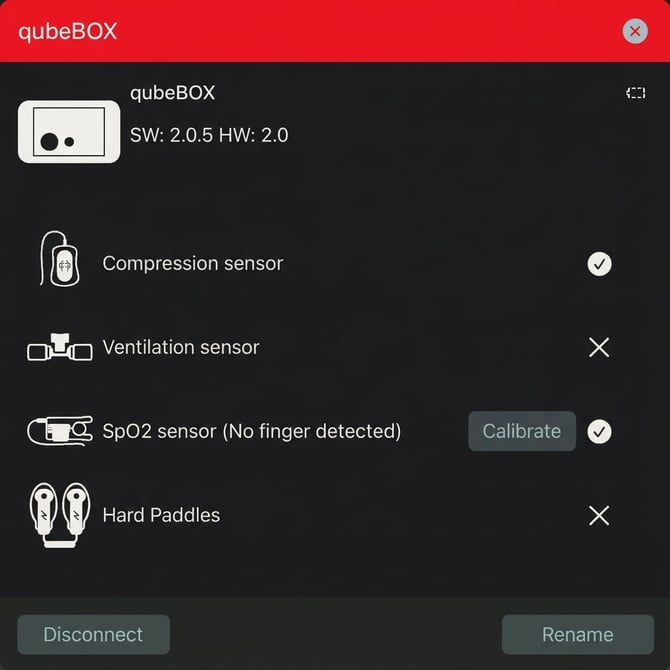
To open the detailed view, click on Overview in the Connection Center in qubeCONTROL and then select the qubeBOX. In the detailed view, the software and hardware versions of the qubeBOX are displayed below its name. A firmware update for the qubeBOX can also be started here (if available). If no button for updating is displayed, no update is available. At the top right, the battery level of the power bank is displayed (if available).
Connected sensors are indicated with a check mark. Non-connected sensors are indicated with a cross. Clicking on the respective sensor displays additional available data (e.g., version numbers). This data is not required for simulation. The SpO₂ sensor can additionally be calibrated. This calibration is only necessary if finger detection no longer functions reliably. To recalibrate the sensor, click on the corresponding button and follow the instructions on the screen. Additionally, the connected qubeBOX can be disconnected or renamed. After renaming, the qubeBOX automatically restarts and must be reconnected.
Function of the Sensors
CPR Feedback Sensor
- Compression depth
- Compression rate
- Chest recoil
→ Real-time display on the monitor and in the CPR dashboard of the controller.
Ventilation Sensor
- Tidal volume
- Ventilation rate
- Ventilation pressure
→ Real-time display on the monitor and in the CPR dashboard of the controller.
SpO₂ Sensor
- Sensor application
→ Activation or deactivation of the waveform display.
Hard Paddles (optional)
- Adjust energy
- Charge defibrillator
- Deliver shock
→ Operation of the defibrillator.
Recommended Storage in qubeL Bag
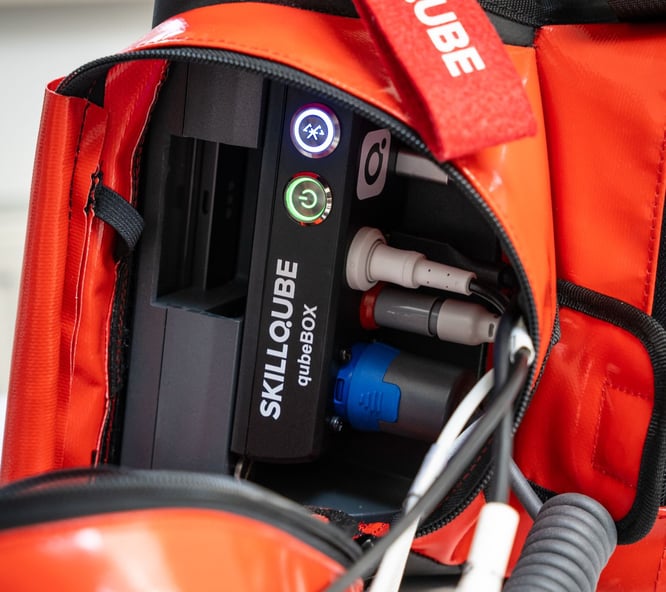
We recommend attaching the qubeBOX directly to the housing. Looking at the monitor from the front, the ideal position is at the rear right. Stick the included metal plates onto this area of the housing. Since the qubeBOX is equipped with magnets on its back, it can be easily and securely attached. The power bank can be stored in one of the side pockets of the qubeL bag. Connect the supplied USB-C cable to establish a connection between the qubeBOX and the power bank.
Cleaning and Maintenance
Clean only with a slightly damp cloth and a mild cleaning agent.
Do not use alcohol-based or aggressive substances.
Regularly check all components for visible damage.
Support and Help
For technical questions or support requests, our team is happy to assist you:
Legal Notice
The qubeBOX is intended exclusively for use in medical simulation training in conjunction with the qubeSERIE. It is not a medical device and must not be used for patient care.